
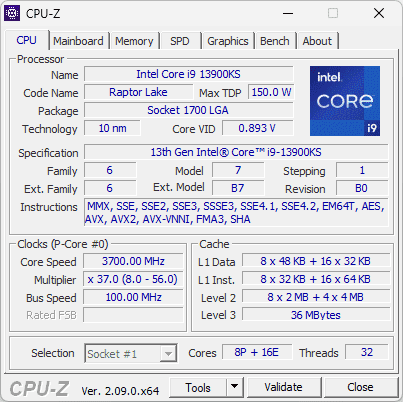
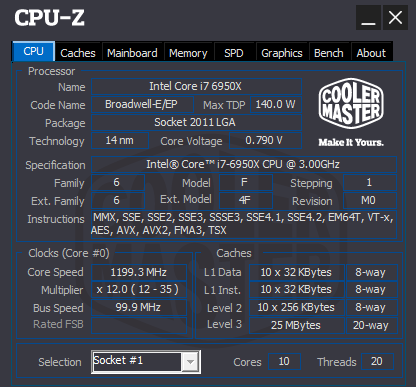
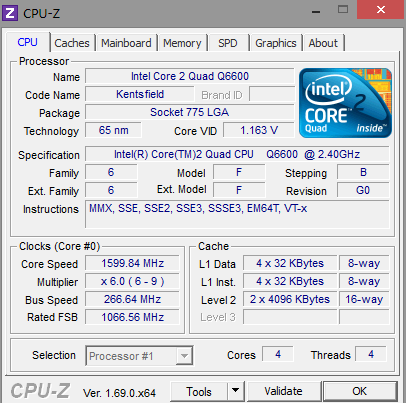
CPU tab
Name, code name, socket, process node, core/thread count, clocks, cache sizes, and supported instruction sets.
Interpret screenshots, avoid scams, share clean reports.
CPU-Z identifies your processor, motherboard, and memory in seconds. Learn what each tab means, validate online, and fix common detection issues.


Confirm the chip matches the listing. Sellers sometimes mislabel generations (e.g. 11th vs 12th Gen).

Use the Bench tab for quick before/after scores. Validate for leaderboards.

Ask for CPU + Mainboard + Memory tabs to avoid back‑and‑forth questions.

Check socket, max RAM, and chipset before buying a new CPU or memory.
Get installer
EXE for Windows x86/x64
Auto 32/64-bit
Installer picks the right build
Validator
Share validation links
Forums and support threads often ask for CPU, Mainboard, and Memory tabs. Add SPD if the question is about RAM speed, XMP, or compatibility. Screenshots beat verbal descriptions and avoid endless back-and-forth.
"DRAM shows half the speed"
Normal. DDR doubles data rate; 1800 MHz = DDR4-3600 effective.
"Clocks fluctuate at idle"
Power-saving reduces frequency. Run a load to see real speeds.
"Where is the temperature?"
CPU-Z is for identification, not monitoring. Use HWMonitor.
"Wrong CPU name"
Update to the latest version. New CPUs need new builds.
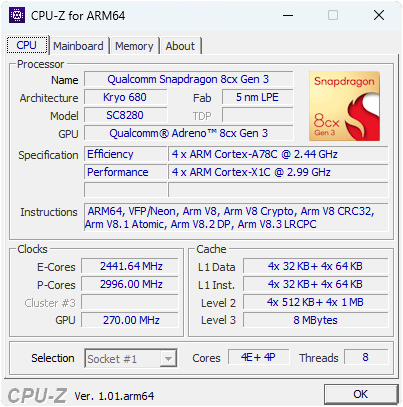
ARM64 / Snapdragon
Main window
Tabs view
Portable
Validation
Compact utility for CPU, mainboard, and memory info.
Full desktop version with all tabs. Runs on Windows 7 through 11.
No installation — extract and run from any folder or USB drive.
Separate builds for Android phones and Snapdragon Windows PCs.
CPU-Z supports multiple languages. OEM skins (ASUS ROG, MSI, Gigabyte, etc.) are available from the download page. The default English build is recommended for clarity when sharing screenshots.

CPU-Z is a long-standing freeware utility that reads identification and timing data from your processor, motherboard, memory modules (SPD), and graphics adapter — without guessing from the Windows label alone.
People paste CPU-Z screenshots when they want strangers on the internet to verify whether a laptop "really has" the CPU they paid for, whether RAM is running at the right speed, or whether a BIOS update changed memory timings. It is also used before selling a PC, RMA conversations, and upgrade planning (socket, chipset, memory type).
Unlike generic "System Information" tools, CPU-Z reads low-level hardware registers and SPD chips directly, so the data is authoritative for identification purposes. For temperatures and voltages, use HWMonitor or similar — CPU-Z focuses on specs, not real-time monitoring.
Laptop vs desktop — CPU-Z works the same on both. Soldered laptop RAM may show limited SPD. Laptops on battery often report lower clocks due to power-saving.
Name, code name, socket, process node, core/thread count, clocks, cache sizes, and supported instruction sets.

Manufacturer, model, chipset, BIOS version, PCI-Express link info — useful to confirm whether a board revision matches drivers you need.

Memory type, size, channel mode, and frequency. SPD dumps module part numbers, XMP/EXPO profiles where exposed, and timings — critical for "why is my RAM 2400 instead of 3600?" threads.

GPU model, process, clocks, and a simple benchmark tab for rough comparisons (not a replacement for dedicated stress tests).

L1/L2/L3 cache sizes, associativity, and line size. Helps confirm cache topology for optimization and debugging.

Single- and multi-threaded benchmark for quick CPU comparisons. Use Cinebench or Geekbench for formal testing.
Windows 11 supported. All tabs update in real time except SPD (static until you switch slots).
When someone says "post CPU-Z", they usually mean CPU, Mainboard, and Memory. Add SPD if the question is about RAM kits or XMP.
Idle clocks drop because of power-saving (Intel SpeedStep, AMD Cool’n’Quiet, modern CPPC). Under load, you should see the CPU approach its advertised or PBO-boosted speeds. If it never rises, check power plan, thermal throttling, or laptop "quiet mode".
Press F9 to switch clock computation methods if you are comparing behavior across versions.
DDR effective data rate is roughly 2× the DRAM frequency shown (DDR double-pumps). A 1800 MHz DRAM clock corresponds to DDR4-3600 effective. If the number looks "half" of what you expect, verify whether you are reading the right field and whether XMP/EXPO is enabled in BIOS.
Bandwidth can be computed from conservative SPD timing fields; kits rated at higher voltage via XMP may appear lower at JEDEC defaults. Always compare the SPD profile list with what is selected in BIOS.
Manufacturer and model help you find the right chipset drivers. BIOS version matters for microcode updates and AGESA revisions. PCIe link width confirms your GPU is running at x16 (or x8 if bifurcated).
Shows GPU name, process, and clocks. Useful for hybrid laptop setups (integrated + discrete) to confirm which GPU is active. For detailed monitoring, use GPU-Z or vendor tools.
Cache sizes, associativity, and line sizes. Helps developers and power users understand cache topology. Rarely needed for forum screenshots unless the question is about cache hierarchy or optimization.
| DRAM freq (MHz) | DDR effective |
|---|---|
| 1066 | DDR4-2133 |
| 1200 | DDR4-2400 |
| 1600 | DDR4-3200 |
| 1800 | DDR4-3600 |
| 2000 | DDR4-4000 |
| 2400 | DDR5-4800 |
| 3000 | DDR5-6000 |
| 3200 | DDR5-6400 |
| 3600 | DDR5-7200 |
CPU-Z can produce a validation file and an online submission used by overclocking leaderboards. The public validator at valid.x86.fr is the reference many users cite when they share a "validation link" instead of images.
Example validation screenshot
Click Tools → Validate in CPU-Z, or use the validation button. Upload the generated file to valid.x86.fr to get a permanent link.
Overclocking records, benchmark submissions, or when a single link is easier than multiple screenshots. Validations include CPU, mainboard, memory, and GPU data.
Privacy tip
Validations can expose hardware details publicly. If you only need tech support, prefer screenshots with serial numbers blurred, or share files only in private tickets.
Official Windows installer (32- and 64-bit in one setup). Use the download button below — third-party sites often bundle adware or old builds.
Run the setup wizard, then open CPU-Z from the Start Menu. Uninstall anytime under Settings → Apps.
The correct 32- or 64-bit binary is chosen automatically. Chinese builds, OEM skins (ASUS ROG, MSI, Gigabyte, …), and legacy Windows 9x builds are listed on the official CPU-Z site.
cpuz.iniSince version 1.51, CPU-Z ships with an installer that registers uninstall entries under Windows Settings. Portable users keep cpuz.exe next to an optional cpuz.ini in the same folder.
| Key | Purpose (short) |
|---|---|
| Sensor | Disable sensor chip probing if a machine hangs during detection. |
| DMI | Turn off DMI reads (BIOS/mainboard strings) when debugging odd freezes. |
| PCI / SMBus | Narrow bus scans — can affect chipset, SPD, and some sensors. |
| Display | Disable GPU reporting for validator-related fields when troubleshooting. |
| ReportFile | Custom path for text/HTML report output. |
| Validate | Enable or disable validation submission. |
Full key list and command-line switches such as -txt=report / -html=report are useful for unattended inventories.
cpuz.exe -txt=report.txt — Export text reportcpuz.exe -html=report.html — Export HTML reportThese are distilled from recurring support threads — written here so search engines and newcomers land on actionable wording, not dead ends.
Usually confusion between DRAM clock and DDR effective rate, or single-channel vs dual-channel. Pair with SPD screenshots showing selected profile.
CPU-Z is not a full monitoring suite. Tools like HWMonitor or Core Temp focus on sensors; CPU-Z focuses on identification.
Disable DMI/Sensor/SMBus/Display probing in cpuz.ini and re-enable one by one to find the culprit.
Check physical slot placement (A2/B2 for most boards). Reseat modules. Verify BIOS memory configuration.
Update CPU-Z to the latest version. Older builds may not recognize new processors.
Some soldered laptop RAM has limited SPD. External modules should show data. Try selecting different slots.
Non-K Intel and non-X AMD CPUs have locked multipliers. This is normal.
Some platforms don’t expose core voltage. Use HWInfo or vendor tools for monitoring.
Check firewall or proxy. Try again later. Some corporate networks block validation uploads.
Rare on supported CPUs. Update CPU-Z. Some very new or very old chips may have limited support.
When buying a used or refurbished PC, ask the seller for CPU-Z screenshots (CPU, Mainboard, Memory). Verify:
Power management is reducing voltage and frequency. Run a short load (Cinebench, Prime95, or a game) and re-check. Laptops on battery can be more aggressive.
Try exporting monitoring data (e.g. from HWMonitor) when reporting anomalies.
Enable the kit’s rated profile in BIOS. If JEDEC is conservative, CPU-Z may show a lower default until XMP/EXPO applies.
CPU-Z reads timings; it does not stress RAM. For errors, many builders still pair information gathering with MemTest86 or similar.
Check power plan (High Performance), thermal throttling, or BIOS limits. Laptops on battery often cap performance.
Disable Sensor, DMI, or SMBus in cpuz.ini. Some hardware combinations cause detection to hang.
CPU-Z is also available for Android and for Windows on ARM64 (Snapdragon-powered PCs).

Shows SoC, cores, RAM, storage, sensors, and battery info. Available on Google Play. Useful for identifying phone/tablet hardware before buying or troubleshooting.
Native build for Snapdragon X Elite/Plus and similar ARM64 Windows devices. Reports CPU, memory, and system info for Always Connected PCs.
ARM builds have a different feature set than x86. Validation links work for supported platforms.
CPU-Z is often the first tool; monitoring and validation come next.
Voltages, temperatures, and fan speeds — complementary to CPU-Z snapshots.
Remote monitoring and extra logging for workshops and power users.
Commercial kit if you need CPU-Z-class detection inside your own Windows or Android product.
GPU identification and monitoring — VRAM, clocks, temperatures. Pairs well with CPU-Z.
Comprehensive hardware info and sensors. Export reports for support or benchmarking.
Bootable RAM tester. Use after enabling XMP or when diagnosing memory errors.
CPU benchmark for single- and multi-thread performance. Industry standard for comparisons.
Cross-platform CPU and GPU benchmark. Good for comparing different architectures.

CPU-Z was first released in the late 1990s by Frank Delattre (CPUID). It has been a staple for PC enthusiasts, overclockers, and support forums for over two decades. The tool reads hardware identification data directly from CPU, chipset, and SPD chips — not from Windows labels — so it remains reliable for verification.
Get the installer or ZIP from the official site. Run cpuz.exe. No admin needed for portable.
You’ll see processor name, cores, threads, and clocks. Idle clocks may be low; that’s normal.
Mainboard = motherboard model and BIOS. Memory = RAM type, size, and speed. SPD shows each stick.
Screenshot CPU, Mainboard, Memory (and SPD for RAM questions). Blur serials before posting.
Tools → Save report (.TXT or .HTML). Useful for inventories, remote support, or documentation.
Tools → Validate creates a file. Upload to valid.x86.fr for a permanent link. Used by HWBOT and overclockers.
If CPU-Z hangs, disable Sensor, DMI, or SMBus in cpuz.ini. Some hardware causes probe issues.
When a forum asks for "CPU-Z", capture these tabs. Blur serial numbers before posting.
The Bench tab runs a quick stress and shows scores. Single-thread reflects per-core performance; multi-thread scales with core count. Use for rough before/after overclock or upgrade comparisons — not for formal benchmarking.
Scores are relative to reference processors. Compare your CPU to the list to get a sense of performance tier. For serious benchmarks, use Cinebench, Geekbench, or PassMark.
CPU-Z can be run silently from the command line for hardware inventories. Use the portable ZIP for USB-based audits or locked-down environments.
cpuz.exe -txt=report.txt creates a full text dump.cpuz.exe -html=report.html for readable, formatted output.CPU-Z Validator
Submit and view validations
MemTest86
RAM stress testing
This guide
Tabs, validation, troubleshooting
